Step 1. Modify Print Job Agent.msi
Download Print Job Agent.msi (ZIP).
Modify Print Job Agent.msi package to
include the name or IP address of the
computer where PrintLimit Print Tracking is
installed, so users don't have to enter it
manually when Print Job Agent is run the
first time on each workstation.
1 Download
orca.msi
2 Double-click it to install Orca
3 Run Orca, click the menu File -> Open
to open Print Job Agent.msi
4 Click menu Edit -> Find, enter CZPJT_IP,
5 click the value of CZPJT_IP, type the
name or IP address of the computer where PrintLimit Print Tracking is installed (for example, 192.169.0.3).
If you don’t want to create a shortcut in Windows
"Start -> All Programs”, you can remove all shortcuts
in “Shortcut” table.
6 Click the menu File -> Save, then
exit Orca.
Tip: Save the file as original
name: Print Job Agent.msi. If not,
it may cause the following Internal Error when
you run MSI.
If you get error "Software
Installation was unable to read the MSI file
\\xxxxx\xxxxx\Print Job Agent.msi. The
following error was encountered: SQL query
syntax invalid or unsupported" when
you deploy the package:
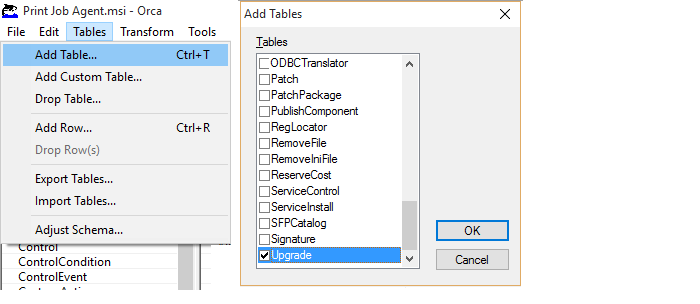
1) Open the MSI file with ORCA
2) Click on Tables -> add tables and add
the Upgrade table.
3) Save the MSI
Step 2.
Create a
Distribution Point
The first step to distributing Print
Job Agent across a network is to provide
a shared location from which clients can
access the Print Job Agent setup files.
If there is not already a shared folder
set up for this purpose then one can be
created in the following manner:
1. Create a folder in a suitable
location with a suitable name
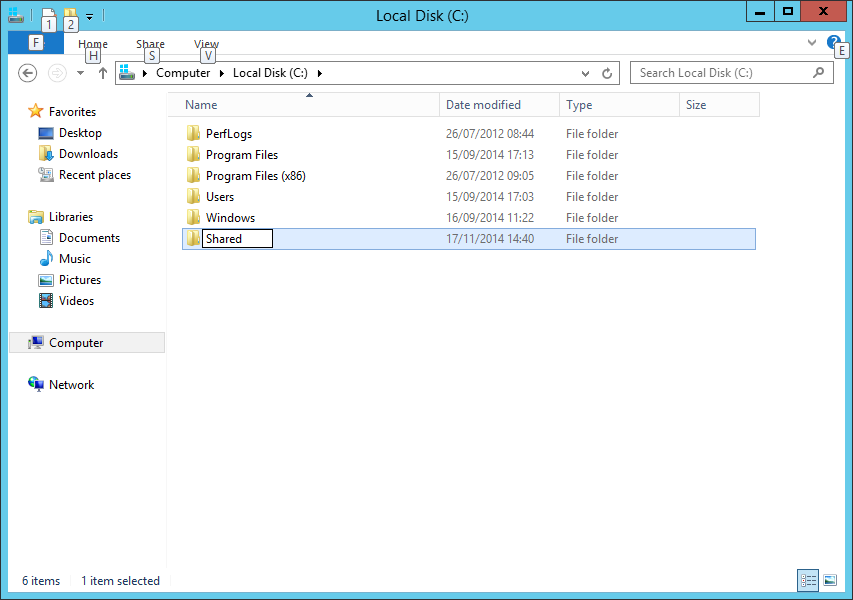
2. Right-click on the new folder
and select Properties
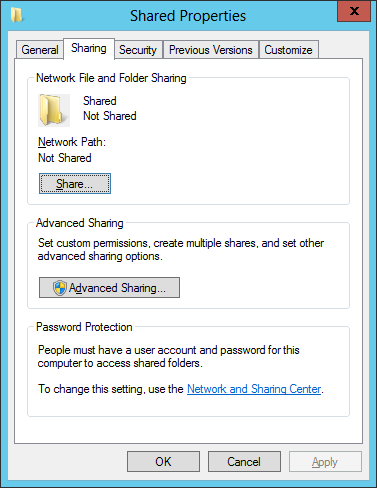
3. In the properties dialog select
the ‘Sharing’ tab and then click on
‘Advanced Sharing…’
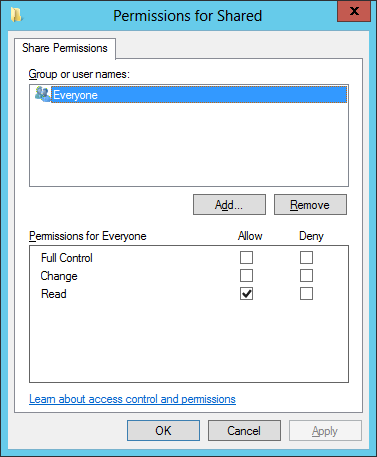
4. Tick ‘Share this folder’ and
then click on the ‘Permissions’
button
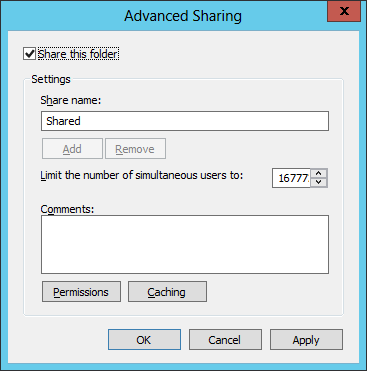
5. Add the ‘Read’ permission to
'Shared' folder, then copy Print Job
Agent.msi to the 'Shared' folder
For Windows
2012 or later
Step 3.
Setting up the
distribution script
Once the files are in a suitable shared
location use the following steps to
distribute them across the network:
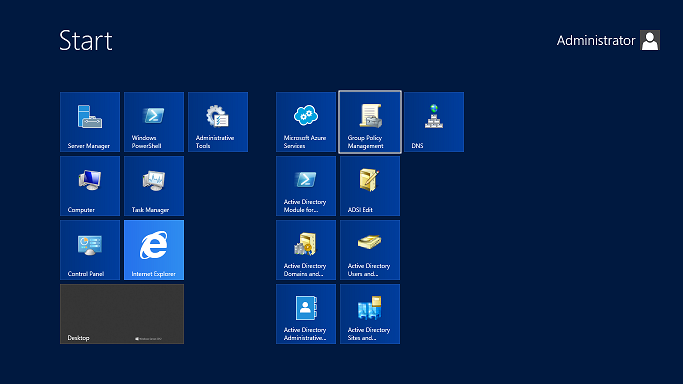
1. Open up the ‘Group Policy
Management’ window by going to ‘Start
Screen’ and locating the Group Policy
Management icon.
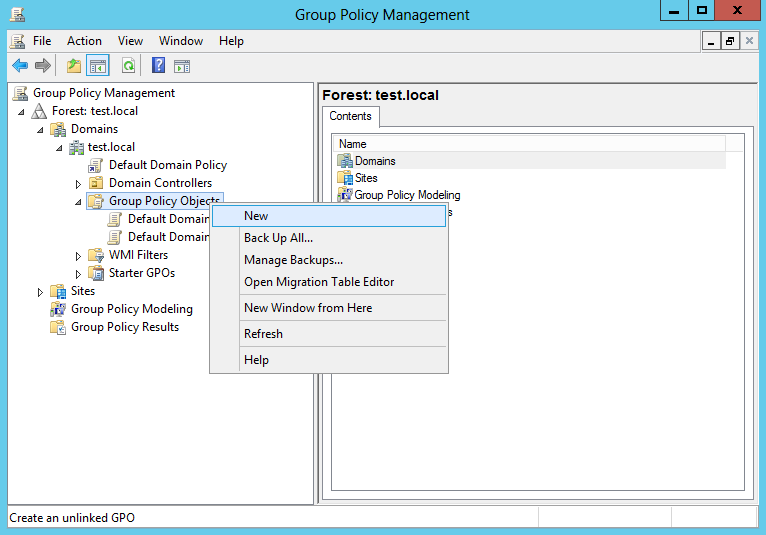
2. Expand ‘Forest: [The Forest] >
Domains > [The Domain]’. Right-click on
‘Group Policy Objects’ and select ‘New’
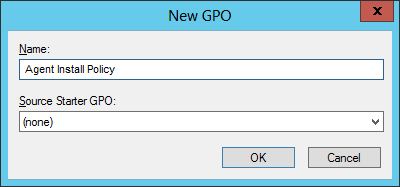
3. Enter a suitable name for the new
policy (e.g., Agent Install Policy) and
leave ‘Source Starter GPO’ as ‘(none)’
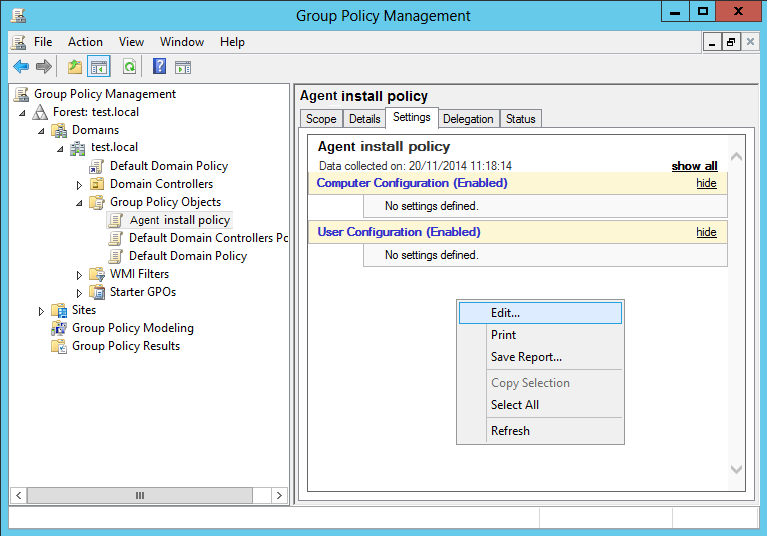
4. Click on the new policy and then
select the ‘Settings’ tab from the
right-hand pane. In this tab are 2
configuration headings: ‘Computer
Configuration’ and ‘User Configuration’.
Right-click anywhere in the panel and
select ‘Edit’
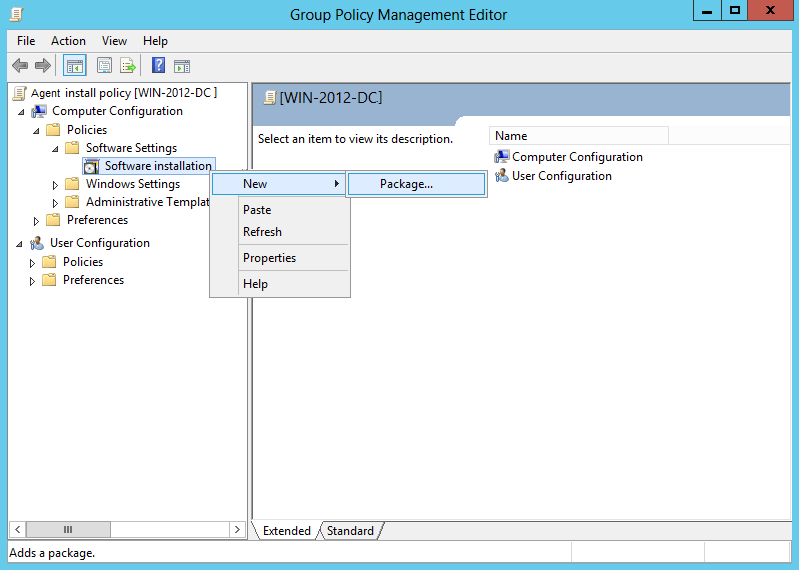
5. Expand ‘Computer Configuration >
Policies > Software Settings’,
right-click on ‘Software installation’
and select ‘New > Package’
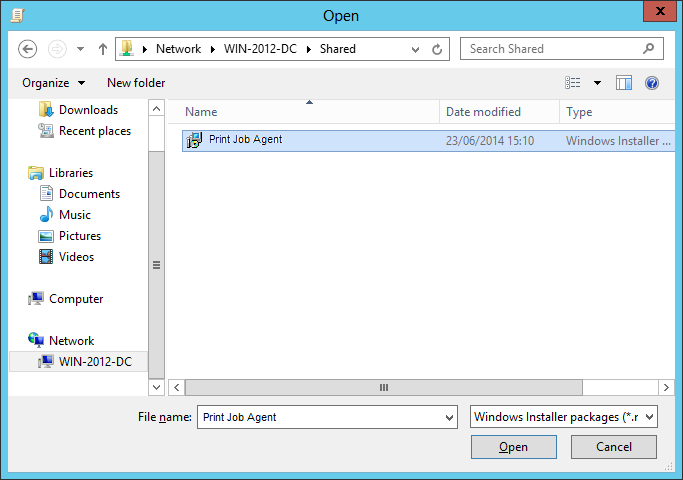
6. Select the network location of
the Print Job Agent installation files
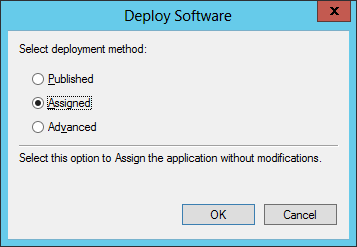
7. In the dialog that appears select
‘Assigned’ and click ‘OK’
8. The selected installer appears in the ‘Software installation’
panel. (This might take a couple of
minutes to happen)

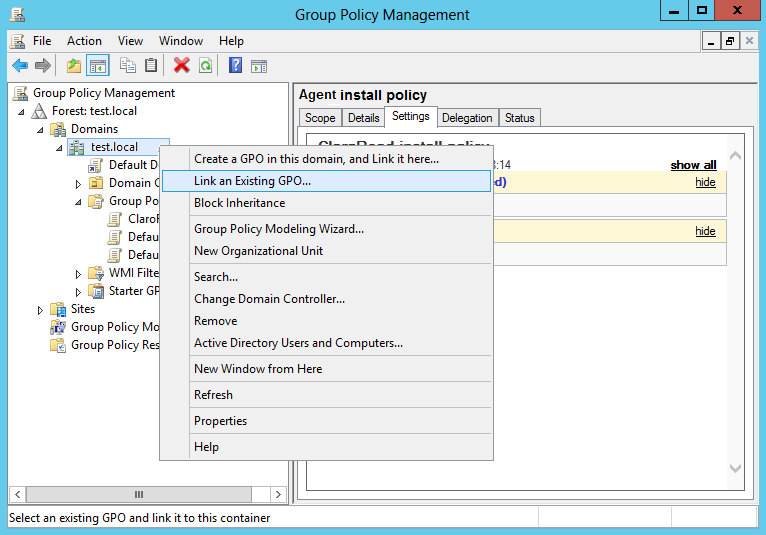
9. Close the ‘Group Policy
Management Editor’ window and return to
the ‘Group Policy Management’ window.
Right-click on the domain name in the
tree and select ‘Link an Existing GPO’
from the drop-down.
10. Select the new policy from the
list and click ‘OK’.
11. Close
the Group Policy snap-in, click OK, and then
close the Active Directory Users and
Computers snap-in.
12. When the
client computer re-starts, the Print Job
Agent package is automatically installed.
How to remove
Print Job Agent through Group Policy?
Right Click on the Print Job Agent
Package listed in right-pane of the Group
Policy window and select Remove.
For Windows
2003/Windows 2008
Step 3. Create a Group Policy Object
To create a Group Policy object (GPO) with
which to distribute the software package:
| 1. |
Start the Active Directory
Users and Computers snap-in. To do this,
click Start, point to Programs, point
to Administrative Tools, and then click
Active Directory Users and Computers. |
| 2. |
In the console tree,
right-click your domain, and then click
Properties. |
| 3. |
Click the Group Policy
tab, and then click New. |
| 4. |
Type the name that
you want to call this policy (for example,
Print Job Agent distribution), and
then press ENTER. |
| 5. |
Click Properties, and
then click the Security tab. |
| 6. |
Click to clear the
Apply Group Policy check box for the
security groups that you want to prevent
from having this policy applied. Click
to select the Apply Group Policy check
box for the groups to which you want
to apply this policy. When you are finished,
click OK. |
Step 4. Assign a Package
To assign "Print Job Agent" to computers
that are running Windows 2000 or later, or to
users that are logging on to one of these workstations:
| 1. |
Start the Active Directory
Users and Computers snap-in. To do this,
click Start, point to Programs, point
to Administrative Tools, and then click
Active Directory Users and Computers. |
| 2. |
In the console tree,
right-click your domain, and then click
Properties. |
| 3. |
Click the Group Policy
tab, select the group policy object
that you want, and then click Edit. |
| 4. |
Under Computer Configuration,
expand Software Settings. |
| 5. |
Right-click Software
installation, point to New, and then
click Package. |
| 6. |
In the Open dialog
box, type the full Universal Naming
Convention (UNC) path to the shared
folder that contains "Print Job Agent.msi"
package that you want. For example,
\\file server\share\Print Job Agent.msi
IMPORTANT: Do not browse to the location.
Ensure that you use the UNC path to
the shared folder.
|
| 7. |
Click Open. |
| 8. |
Click Assigned, and
then click OK. The package is listed
in the right pane of the Group Policy
window. |
| 9. |
Close the Group Policy
snap-in, click OK, and then quit the
Active Directory Users and Computers
snap-in. When the client computer starts,
the managed software package is automatically
installed. |
Step 5. Publish a Package
To publish a package to computer users and
make it available for installation from the
Add/Remove Programs tool in Control Panel:
| 1. |
Start the Active Directory
Users and Computers snap-in. To do this,
click Start, point to Programs, point
to Administrative Tools, and then click
Active Directory Users and Computers. |
| 2. |
In the console tree,
right-click your domain, and then click
Properties. |
| 3. |
Click the Group Policy
tab, select the group policy object
that you want, and then click Edit. |
| 4. |
Under User Configuration,
expand Software Settings. |
| 5. |
Right-click Software
installation, point to New, and then
click Package. |
| 6. |
In the Open dialog
box, type the full UNC path to the shared
folder that contains "Print Job Agent.msi"
package that you want. For example,
\\file server\share\Print Job Agent.msi
IMPORTANT: Do not browse to the location.
Ensure that you use the UNC path to
the shared folder. |
| 7. |
Click Open. |
| 8. |
Click Published, and
then click OK. The package is listed
in the right pane of the Group Policy
window. |
| 9. |
Close the Group Policy
snap-in, click OK, and then quit the
Active Directory Users and Computers
snap-in. |
| 10. |
Test the package:
| a. |
Log on to a
workstation that is running
Windows 2000 Professional or
later by using an account to
which you published the package. |
| b. |
Click Start,
point to Settings, and then
click Control Panel. In Windows,
click Start, and then click
Control Panel. |
| c. |
Double-click
Add/Remove Programs or click
Add or Remove Programs), and
then click Add New Programs. |
| d. |
In the Add
programs from your network list,
click "Print Job Agent"
that you published, and then
click Add. "Print Job
Agent" is installed. |
| e. |
Click OK, and
then click Close. |
|
Redeploy a Package
In some cases, you may want to redeploy a
software package. For example, if you upgrade
or modify the package. To redeploy a package:
| 1. |
Start the Active Directory
Users and Computers snap-in. To do this,
click Start, point to Programs, point
to Administrative Tools, and then click
Active Directory Users and Computers. |
| 2. |
In the console tree,
right-click your domain, and then click
Properties. |
| 3. |
Click the Group Policy
tab, click the group policy object with
which you deployed the package, and
then click Edit. |
| 4. |
Expand the Software
Settings container that contains the
Software installation item with which
you deployed the package. |
| 5. |
Click the Software
installation container that contains
the package. |
| 6. |
In the right pane of
the Group Policy window, right-click
"Print Job Agent", point to All Tasks,
and then click Redeploy application.
The following message is displayed:
Redeploying this application will
reinstall the application everywhere
it is already installed. Do you
want to continue?
|
| 7. |
Click Yes. |
| 8. |
Quit the Group Policy
snap-in, click OK, and then quit the
Active Directory Users and Computers
snap-in. |
Remove a Package
To remove a published or assigned package:
| 1. |
Start the Active Directory
Users and Computers snap-in. To do this,
click Start, point to Programs, point
to Administrative Tools, and then click
Active Directory Users and Computers. |
| 2. |
In the console tree,
right-click your domain, and then click
Properties. |
| 3. |
Click the Group Policy
tab, click the group policy object with
which you deployed the package, and
then click Edit. |
| 4. |
Expand the Software
Settings container that contains the
Software installation item with which
you deployed the package. |
| 5. |
Click the Software
installation container that contains
the package. |
| 6. |
In the right pane of
the Group Policy window, right-click
"Print Job Agent", point to All Tasks,
and then click Remove. |
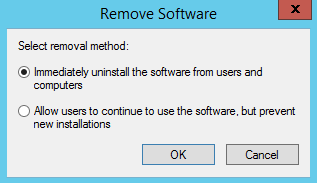
| 7. |
Do one of the following:
| |
Click Immediately
uninstall the software from
users and computers, and then
click OK. |
| |
Click Allow
users to continue to use the
software, but prevent new installations,
and then click OK. |
|
| 8. |
Quit the Group Policy
snap-in, click OK, and then quit the
Active Directory Users and Computers
snap-in. |
Troubleshooting
Published Packages Displayed
on Client Computer After You Use a Group Policy
to Remove Them
This situation can occur when a user has
installed "Print Job Agent" but has
not used it. When the user first starts the
published "Print Job Agent", the installation
is finalized. Group Policy then removes
"Print Job Agent".